photography course malaysia
wedding photography malaysia
photography course malaysia
wedding photography malaysia
photography course malaysia
wedding photography malaysia
photography course malaysia
wedding photography malaysia
wedding photography malaysia
photography course malaysia
wedding photography malaysia
photography course malaysia
wedding photography malaysia
photography course malaysia
wedding photography malaysia
photography course malaysia
wedding photography malaysia
photography course malaysia
wedding photography malaysia
photography course malaysia
wedding photography malaysia
photography course malaysia
wedding photography malaysia
wedding photography malaysia
photography course malaysia
wedding photography malaysia
photography course malaysia
wedding photography malaysia
photography course malaysia
wedding photography malaysia
photography course malaysia
wedding photography malaysia
photography course malaysia
wedding photography malaysia
photography course malaysia
wedding photography malaysia
photography course malaysia
wedding photography malaysia
wedding photography malaysia
photography course malaysia
wedding photography malaysia
photography course malaysia
wedding photography malaysia
photography course malaysia
wedding photography malaysia

Disclaimer | Privacy | Copyright | Areas Covered | Contact
© 2009-2014 sanfreelancephotography.com. All rigths reserved. Managed by Smartmind Solutions Sdn Bhd.
© 2009-2014 sanfreelancephotography.com. All rigths reserved. Managed by Smartmind Solutions Sdn Bhd.

TimeLapse Photography
In my own way of definition, TimeLapse Photography is a technique that allows you to "Fast Forward" time. I also call it "Time Traveling". For example you need to capture 12 hours of video to record Sunrise to Sunset. But in TimeLapse, you can show Sunrise to Sunset in less than 5 minutes by taking intermittent photos over the duration of 12 hours and run the photos in video editing software. So, instead of watching a 12 hours movie, you can watch 5 minutes movie of Sunrise to Sunset.
Another example with mathematicalcalculation:
- Actual Duration of Scene = 12 hours = 43,200 seconds
- You want a 2 minutes video or 120 seconds
- Video Frame Per Second is 25 fps
- So, you need 120s x 25 fps = 3000 shots within 43200 seconds
- 43200s/3000 shots = 15 seconds interval between each shots
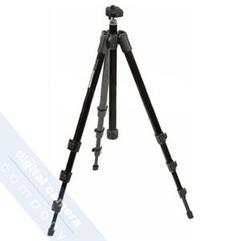
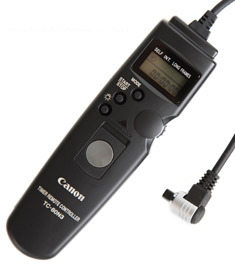
So you need something to control your camera because you will not be waiting and taking the shots manually. You need and Intervolameter or a timer to maintain the required interval and control the shutter. And you need a good/steady tripod, not the free tripod that comes with your camera when you first purchased it from a shop. Shop will normally give out cheap and low quality tripod as a sales gimmick. That tripod will start vibrating when the shutter moves. It is built for compact cameras not DSLRs.
Another example with mathematicalcalculation:
- Actual Duration of Scene = 12 hours = 43,200 seconds
- You want a 2 minutes video or 120 seconds
- Video Frame Per Second is 25 fps
- So, you need 120s x 25 fps = 3000 shots within 43200 seconds
- 43200s/3000 shots = 15 seconds interval between each shots
So you need something to control your camera because you will not be waiting and taking the shots manually. You need and Intervolameter or a timer to maintain the required interval and control the shutter. And you need a good/steady tripod, not the free tripod that comes with your camera when you first purchased it from a shop. Shop will normally give out cheap and low quality tripod as a sales gimmick. That tripod will start vibrating when the shutter moves. It is built for compact cameras not DSLRs.
Essential Equipment
Intervolameter
It is advisable not to shoot in AUTO, Aperture or Shutter Priority Mode. The exposure values of these modes varies according to actual light changes. For example in Aperture Mode, your camera will change the shutter speed when there is a change of light source, say during sunset. When you sequenced the photos in a video software you will see drastic and obvious exposure changes or also known as "Flickering".
In Manual mode, the camera maintains the speed and aperture even though there is sudden change in actual ambient light. For example, if you are shooting the sun where sudden thick clouds passes, the actual ambient light should change and you should see darker exposure when the clouds cover the sun. In manual mode, you can see these changes occurring naturally. In AUTO mode where your camera will always try to maintain EV reading to "0", exposure will be adjusted every time there is a change in ambient light. Thus, the camera will brighten the scene when the clouds cover the sun. The rapid exposure changes can be seen clearly which is unnatural.
In Manual mode, the camera maintains the speed and aperture even though there is sudden change in actual ambient light. For example, if you are shooting the sun where sudden thick clouds passes, the actual ambient light should change and you should see darker exposure when the clouds cover the sun. In manual mode, you can see these changes occurring naturally. In AUTO mode where your camera will always try to maintain EV reading to "0", exposure will be adjusted every time there is a change in ambient light. Thus, the camera will brighten the scene when the clouds cover the sun. The rapid exposure changes can be seen clearly which is unnatural.
Camera Setting
Picture Format
Imaging taking 5000 pictures in RAW? Then you need to crop the images for 16:9 ratio or need to change the entire white balance. You really need plenty of disc space and very fast computer to process them.
Shoot JPEG but make sure you have the setting correct so that you spend less time editing. Shooting JPEG is the best option for TimeLapse. I normally shoot
Shoot JPEG but make sure you have the setting correct so that you spend less time editing. Shooting JPEG is the best option for TimeLapse. I normally shoot
Picture Format
The easiest TimeLapse application is QuickTime Pro. But I find that QuickTime tends to adjust exposure automatically. Easy to use but not the best result. Before you start the application you need to decide the VideoResolution i.e. either HD format or Standard Format. The simplest one is standard format 3:2 video size. You do not have to crop your pictures to produce this standard format.
But if you intend to produce HD video of say, 1920 x 1080 or 1280 x 760, your pictures need to be cropped to 16:9 ratio.
Step 1 - Place all pictures to be sequenced into one folder.
Step 2 - Open QuicktimePro
Step 3 - Click File > Open Image Sequence
Step 4 - Browse you Hard drive and select the folder containing pictures you want to process.
Step 5 - Click on the first image of the folder.
Step 6 - Select the video frame speed (normally I choose 25 fps which is the same as my HD videos taken from my Canon). Then, Click OPEN.
Depending on the size of your images and speed of your computer, QuickTimePro will arrange the images in sequence based on the speed setting. It is not a movie file until you save it.....so.....SAVE IT!!!!
Post Processing