BASIC ADOBE PHOTOSHOP CS4
In order to follow this tutorial you need to have your computer installed with Adobe Photoshop CS4 Extended.
Adobe Photoshop CS4 comes with the following 3 essential applications
- Adobe Bridge (Bridge)
- Adobe Camera Raw (ACR)
- Adobe Photoshop CS4 (CS4)
My work flow is pretty simple.
- Download with Bridge. Manage folder and files in Bridge.
- Basic Editing in ACR
- Final editing and enhancement in CS4
- Save file, print or publish in website
TIPS
If you shoot in JPG, I advise you start shooting in RAW. I shoot in RAW because I get the flexibility and optimum resolution and image quality. If you need to know more about RAW, do web check.

Disclaimer | Privacy | Copyright | Areas Covered | Contact
© 2009-2010 sanfreelancephotography.com. All rigths reserved
© 2009-2010 sanfreelancephotography.com. All rigths reserved
Is this tutorial helpful? Help us improve this site for the benefit of others. Please send me your comments or feedback to
san@sanfreelancephotography.com
san@sanfreelancephotography.com
As I mentioned earlier, digital photographers cannot run away from knowing or mastering photoshop because this is the most essential photo editing software and most widely used application in the world. If you have got the right exposure whilst taking your shots, digital editing will further enhance the images, thus, getting the best output similar to those available in the printing/media industry.
Having said that, knowing PS is not an excuse for not capturing technically correct photos. If you want the best output, GET IT RIGHT during photoshoot.
For those who are new with PS, this is a great start. We designed this tutorial series to assist new photographers in photo editing based on my work flow and editing style. I am not the best known PS user in this country or the best designer but I create my own work flow and have my own preferences. Follow what you like or define your own work flow and style.
Chapter 1 : Introduction
Chapter 2 : File Management (Bridge)
Adobe Bridge is basically a file management application. It is not the same as windows explorer but pretty much the same purpose, which is to enable you manage your photos. As a photographer, you will be taking hundreds or photos in one assignment or outing. Thus, having a thousand photos in a few outings is not impossible. If you are a full time photographers, you can accumulate thousands of photos in a month. Now that can be a hell of a mess!!!
You may now wonder why I recommend RAW format while accumulating thousands of photos in a month is impossible? Camera manufacturers designed high resolution DSLR not for you just to capture photos in 2MB or 5MB JPG? Everything is there for a reason. They spent millions of dollars to come up with high res sensor. If you want high quality images, you need to use high res images, as simple as that! Disc space is not a problem nowadays. "1TB" external HDD of good quality Western Digital only cost me around RM350. DVD is now less than RM0.50! You can have all the disc space you need. The only problem is how to manage and whether or not you computer is up for the task.
Lets go to bridge now.
Open Bridge window and you will notice the following:

Navigation - Split into two i.e. Folders or Favorite. Choose Folders and the active folders will be shown. Navigate the location of your photos here, similar to using windows explorer.
Filtering - Basically a system which allows you to search for photos based on the selected categories. My files are arranged in folders according to its group and I have no problems looking for any specific photos I need. So, I do not use filtering to sort my photos. If this is useful for your workflow, do explore them.
Preview - The image you have selected will be displayed in the preview window.
Info - Metadata related to the photos will be displayed here.
Navigation Options : Look at the top right next to search button, Filmstrip, Metadata and Output. If you like to view your photos in Filmstrip mode, just click it. Explore the rests of the options and choose your favorite. As for me, I prefer the Filmstrip style simply because I mainly want to see the photos and not really interested on the technical info and the small preview window. They take up space.
Downloading Photos in Bridge
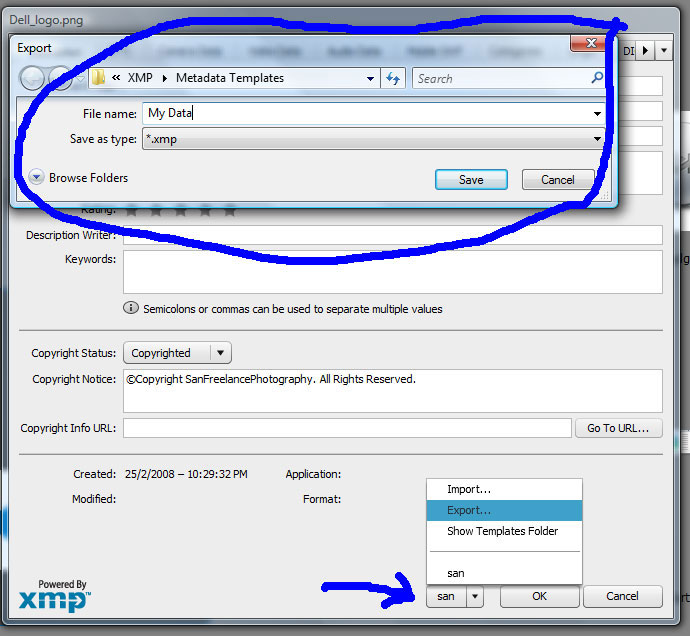
Before downloading you need to first create your Metadata Template. Information from your Metadata Template will be embedded in the photos. It is like attaching your copyright on the photos
1- Open Bridge window and navigate to any photo you have.
2- Right Click on the photo and choose "File Info". XMP Metadata Template will appear.
3- Fill up as many info as you like.
4- Save the template by selecting "Export" at the bottom right of the template window.
5- The template that you have saved can be retrieved when you download files using Bridge.

8- Connect your camera to your computer and switch it ON. Your computer will automatically detect the device and prompt you which application to be used to download the files. You should choose Adobe Bridge.
9- Otherwise, open Adobe Bridge and click on the "Camera" icon (Top Menu) which is also known as "Get Photos From Camera".
10- The photo downloader window will open.
9- Otherwise, open Adobe Bridge and click on the "Camera" icon (Top Menu) which is also known as "Get Photos From Camera".
10- The photo downloader window will open.
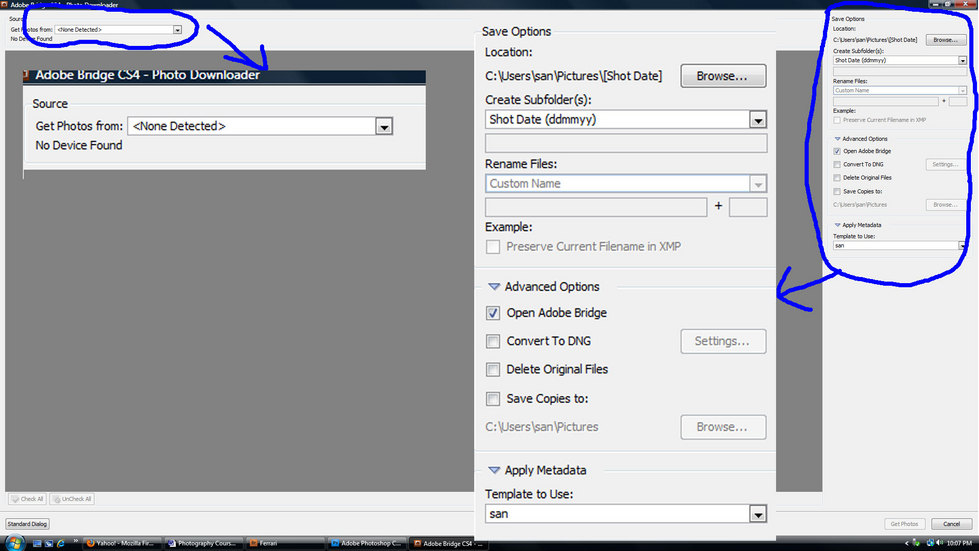
11- By default, all photos in the selected device will be "checked". If you want to select photos, click "Uncheck All". Then, select the photos you want to download simply by clicking them. For multiple photos, use the shift or control button.
12- You need to change the folder name by changing the location and creating new folder name.
13- You may also want to change the file name because by default the file numbers will be used as file name which has no significant meaning at all. If you do not change the name, you may have difficulty tracing your photos.
14- Check "Open Adobe Bridge" so that Adobe Bridge will be opened once downloading completed.
15- Convert to DNG is an option for you to convert your raw files into CS4 own raw files. "Digital Negative" they call it, is basically a format created by Adobe which they claim to be useful for the future Photoshop versions. (I prefer to maintain my original RAW files).
16- "Delete Original Files" - Check this and the files in your camera card will be deleted upon completion of downloading.
17- "Save Copies To : - This allows you to duplicate you files to another location for example another external hard disc drive. Thus, you have 3 copies i.e. in camera, in computer and another location of hard drive.
18- "Apply Metadata" - This is where you can import the Metadata Template that you have created earlier. The information will be embedded to the photos.
19- Lastly, start downloading.
Familiarizing with Adobe Bridge
I'm not gonna spend too much time on Bridge. In simplicity, Bridge is a file management system of PS CS4. Think of it like "Windows Explorer" but with so many other facilities to assist you in managing your photos. I will share some useful tips and information on which tools I normally use for my daily photo editing needs.
First you need to decide which viewing style you like. Look at the "TOP RIGHT". You'll see options like Essentials, Filmstrip, Metadata and arrow button. The current viewing style will be highlighted. Metadata is for those who like to see the photo XMP Metadata when editing. The right corner of the window will have smaller preview and metadata. You can click and choose the best that suits your need but my favorite is Filmstrip. It gives a larger view of the photo I selected from the filmstrip. I am more concern on the photos than the metadata. If I need to read metadata, I will just switch to Metadata preview for a short while.
You can change the size of the windows in Bridge. Bring your cursor to any edge and you will see arrow adjsustment. Customize as you like. If somehow you screw up in the adjustment and want to go back to default, click the arrow icon next to METADATA and choose "Reset Workspace". Your Bridge window will be set to its original setting.
You can change the size of the windows in Bridge. Bring your cursor to any edge and you will see arrow adjsustment. Customize as you like. If somehow you screw up in the adjustment and want to go back to default, click the arrow icon next to METADATA and choose "Reset Workspace". Your Bridge window will be set to its original setting.
Slideshow - Click to any folder and then click "View" > Slideshow.
For photo review, try "Review Mode" by clicking "View" > Review Mode. Clicking left and right arrow of your keyboard will move the photos accordingly. If you click "down" arrow button, the photo will be removed from the preview but NOT deleted. This tool is normally used by photographers dealing with hundreds of photos at one time. It is a good selection tool. When you close the review mode window, you will notice that those remaining photos from review mode will be highlighted. Label them immediately. These will be you selected photos where you can create another folder or you can delete the unselected photos. The choice is yours.
Photo Stacking - If you are starting to shoot high dynamic range (HDR) or panorama you might want to use the stacking tool. Very simple to use, highlight the relevant photos, Right Click and choose "Stack" > "Group as Stack". Alternatively, you can also click "Stacks" option to stack the photos. To unstack, use the same method. Why do you need to stack? When you shoot HDR or Panorama, you will have multiple shots of one or a few scenes. With hundreds of photos in the same folder which look alike, you can get yourself confused and you may go "cocoo" or "nuts" when trying to locate photos. Stacking will also make things easier when you want the merge or blend the photos.
Open In Raw - I rarely use this button because I shoot in Raw. Double clicking RAW/DNG file will open Adobe Camera Raw (ACR) window. But double clicking JPG/TIFF or other image file will take you straight to CS4. If you are not shooting in RAW you need to click the Open in Raw icon to take you to ACR. Note that if you click a PSD (photoshop layer file) it will open in CS4 only.
to be continued,...............
LETS START EDITING
Before we start editing you may want to check your ACR version. Whenever new camera model introduced Adobe will update their ACR version. You need to download the update to enable the ACR to read the new camera RAW format.
I normally do my editing in ACR first before getting the final touch in CS4 for printing or display. ACR is where I do the following:
- Color Correction or White Balance Check.
- Exposure adjustment
- Color control like saturation/vibrance
I normally do not edit the following in ACR:
- Noise reduction (Noise reduction in CS4 has more room for advance adjustment)
- Sharpening (This normally my last step in editing before printing or display and CS4 Sharpening has more control and so much better)
- Cropping ( I will only crop once I have decided the size of photo I want. If I crop in ACR and later decided to have different cropping size, I may need to go back from CS4 to ACR)
White Balance Correction
ACR tools are designed and placed systematically to assist photographers with the most efficient editing flow possible.
Opening ACR will take you first to the "BASIC" tool adjustment. BASIC tool adjustment allows you to do the following:
- White Balance Adjustment
- Exposure Control
- Color saturation
It is normal for new photographers to use Auto White Balancing which will normally apply a warmer WB. To correct WB, here is what you need to do:
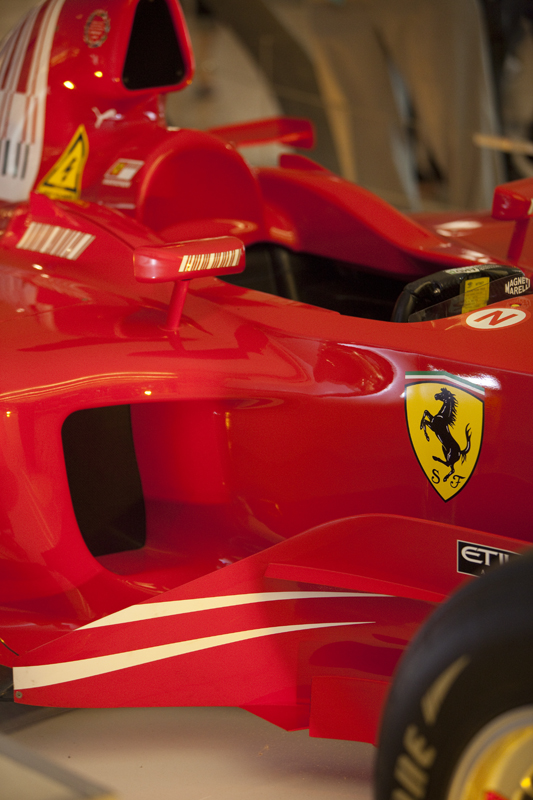
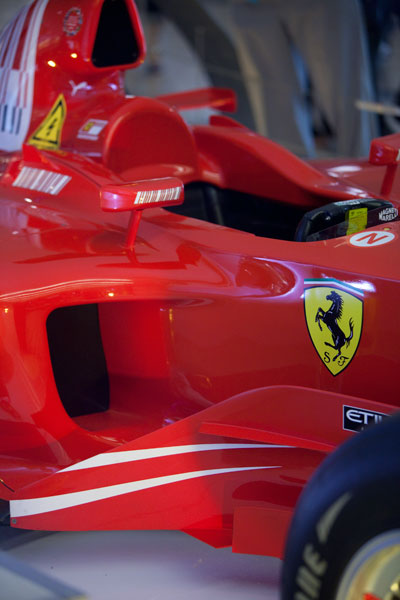
1 - If there is a white color or neutral gray in the image (even a small one), just use the WB tool and click on the white or gray color. WB will be automatically corrected. For example the ferrari car here have white stripes and you will notice that the stripes has a yellow cast. The color is too warm.
white balance tool is 3rd from the left
The second photo shows corrected WB. It looks better. The real colors.
Opening ACR will take you first to the "BASIC" tool adjustment. BASIC tool adjustment allows you to do the following:
- White Balance Adjustment
- Exposure Control
- Color saturation
It is normal for new photographers to use Auto White Balancing which will normally apply a warmer WB. To correct WB, here is what you need to do:
1 - If there is a white color or neutral gray in the image (even a small one), just use the WB tool and click on the white or gray color. WB will be automatically corrected. For example the ferrari car here have white stripes and you will notice that the stripes has a yellow cast. The color is too warm.
white balance tool is 3rd from the left
The second photo shows corrected WB. It looks better. The real colors.

What if there is no white or neutral color in your image?
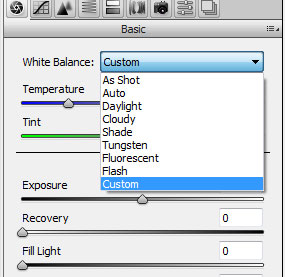
Option 1 - If you are shooting in RAW/DNG, you can change the WB preset in ACR. Choose the available options in Basic Tool as shown below.
Note that this option is not available with other than RAW/DNG files.
Option 1 - If you are shooting in RAW/DNG, you can change the WB preset in ACR. Choose the available options in Basic Tool as shown below.
Note that this option is not available with other than RAW/DNG files.
Option 2 - Use WB Temperature sliders to manually adjust by looking at the original image. You need to rely on your eyes and this will require plenty of practicing. But here is the simple rule; Sliding Temperature to the left create cooler color and making it blueish. Move the slider to the right to create warmer color and color cast towards yellowish.
Which way to slide? Easy. If you think your image looking too warm or too much yellow cast, move slider to the left while you watch the color changes. Stop when you think you have the closest color match to actual scene. If original image look blueish or you want a warmer look, just slide to the right.
Tint Slider ? This slider is color compensating slider which I do not use. But I'll explain anyway. If there is too much green cast on your image, slide it to the right. If too much magenta, slide it to the left.
WB Tips
Here is a simple tips. If you are shooting in a controlled or constant light source like a function room or studio or office, shoot a white balance card simply by having someone to hold it. You can also use a white paper or any other white or gray color as a reference point. In ACR, highlight the images within the same WB as the reference card, synchronize them and click on the WB card/reference. The selected images will have the same WB.
EDITING MISTAKES - A STORY TO TELL (Part 1)
Photography is not just a form of art expression and means to get decent income. It is also an obligation to provide the best image quality. Whether you are shooting for income generating or just as a hobby, you need to show them (your client or your audience) how the images should look like. And it should at least be pleasing enough for the audience, if not the best quality.
I've seen too many of these mistakes ( as i call it ) among new or young photographers who lacks the knowledge or care less in improving their knowledge that it forces me to express my concern. What's written here is for the benefit of the photography industry which is to shift it to the next level..... high quality images and towards educating photographers. Most photographers in Malaysian market may not like this but I think they should carry their duty and give the client what they have paid for...... Before hiring a photographer you may have seen their work, if not through live sample, at least through their website (which can be very deceiving). But after your wedding, the photos produced is far from the quality you expected. How would you feel? Certainly you felt cheated but nothing you can do to change it, unless you intend to redo your wedding....
You will find these common mistakes from most of malaysian local wedding photographers. To their clients whom have little or no knowledge at all about image quality, they have nothing to complaint about because the photos are "Good" enough for them. Frankly speaking, if the same quality produced in places like the States or Paris, these photographers will probably starved to death for not getting assignments or perhaps being sued on Professional Liability grounds.
A couple recently had their wedding where I attended their session in full and agreed to shoot for them although they had already hired an official photographer. Had some simple editing and hand them my printouts. Couldn't describe to you their expression of happiness but that is just one of the beauty of photography. It can make people joyful but do it wrongly, you can kill your own career. Then I was shown printouts from their official photographer and to my disbelieve as well, most of the WB and skin tone of the couple or any human being in the images were badly distorted or possibly not corrected. I saw a lot of whites turn to yellowish and the husband's normal Malay skin tone turned to dark color. Even the couple noticed their skin tone totally changed.... exaggeratedly. Yes, that's the word to describe it.... exaggeration.

Photo on the left was a mimic of what was shown to me by the couple (not exact but quite close). The mistakes were:
1- White Balance : Probably was shooting on Auto WB which most cameras will tend to use a warmer color temperature within the AWB Auto WB) temperature range. Resulting in mostly slight yellowish/redish skin tone. The right WB should be about 5050K but the one on the left is about 5550K. The WB should be corrected at site of at least do the correction in post processing. Leaving it as it is will create more problem which I will elaborate in the next points.
2- Oversaturation - Another common mistake is to attempt to bring out color depth by adjusting saturation. Saturation is color depth adjustment on the entire image including skin tone. Everything in the image will be adjusted. If you got the wrong WB, saturation will enhance the ugliness of that wrong skin tone. In order to get more color depth without affecting skin tone, use Vibrance adjustment.
3- Contrast - Contrast adjustment if applied aggressively can produce an ugly image. Contrast adjustment tends to darken edges and skin tone. You need to understand that Exposure, Contrast, Brightness, etc, all lighting adjustment in photoshop or any editing software is meant to control specific area of exposure in the Histogram. You need to know what you want o adjust before tweaking around with the controls. Unfortunately, many will just tweak the controls without proper direction and stop when they think the image is pleasing to their own eyes.
Photo on the right is the one without adjustment except a correct WB. Off course it looks plain but you can always saturate some colors here and there. A small vibrance adjustment and slightly increasing the color temperature will work just fine. But would you prefer your photo on the left or the right?