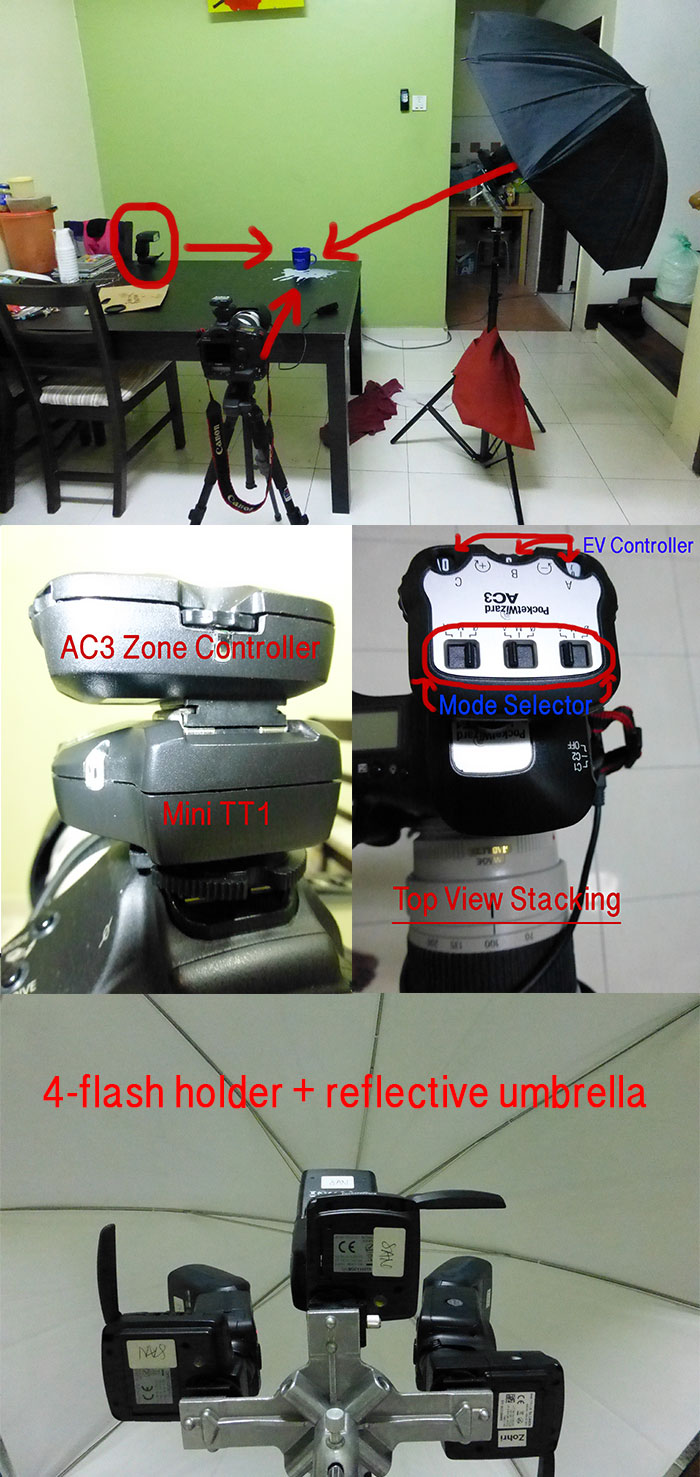
My Equipment : Canon 5DMKII, EF70-200 F2.8L IS USM, 2 x 580EXII Speedlite, Pocket Wizard Mini TT1, 2 x Pocket Wizard Flex TT5, 2 x Flash Holder, Tripod, Light Stand and a bicycle.
Actual Weather : At about 10.00 am, clear Sky, Temperature (very hot!)
Actual Weather : At about 10.00 am, clear Sky, Temperature (very hot!)
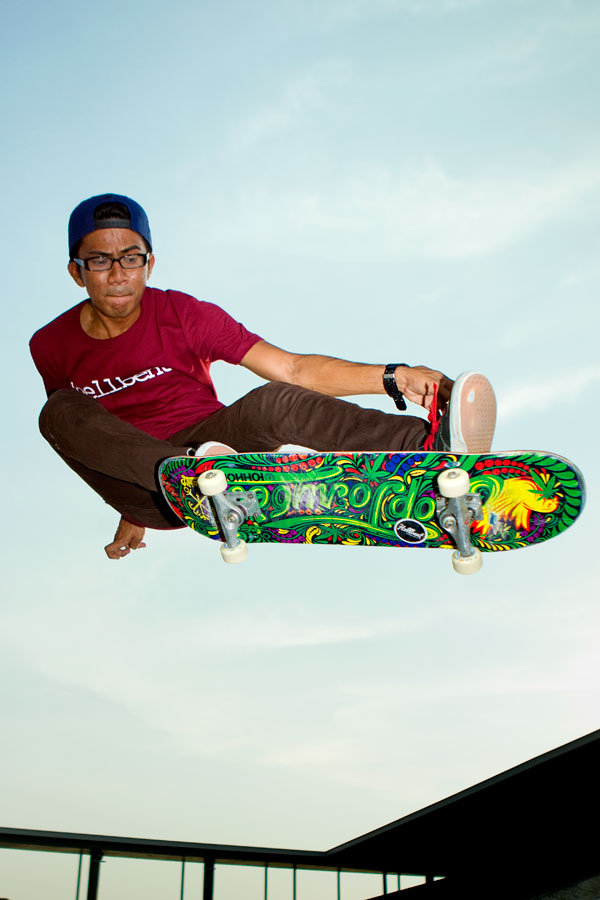
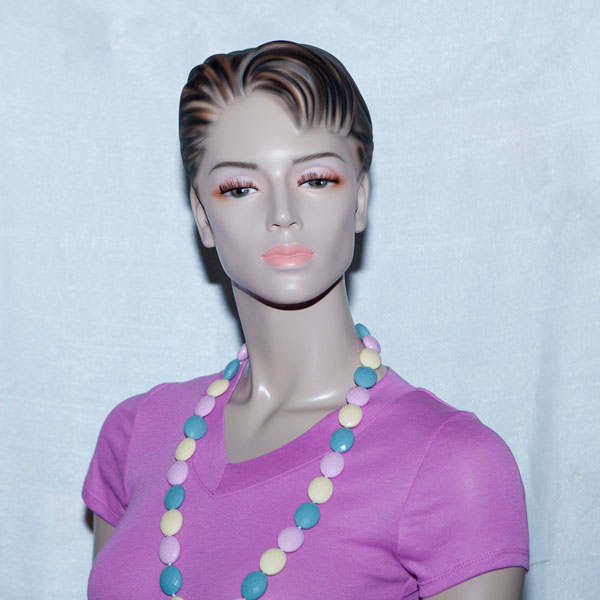
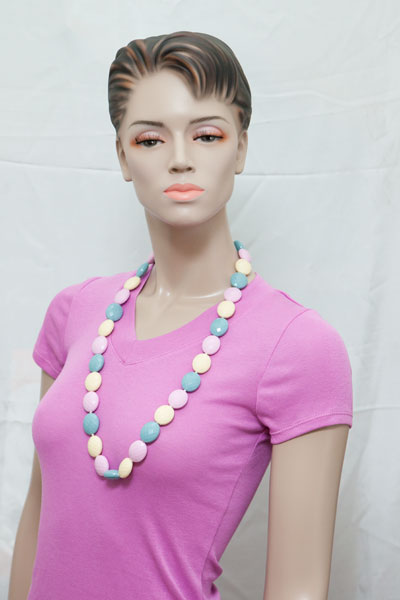
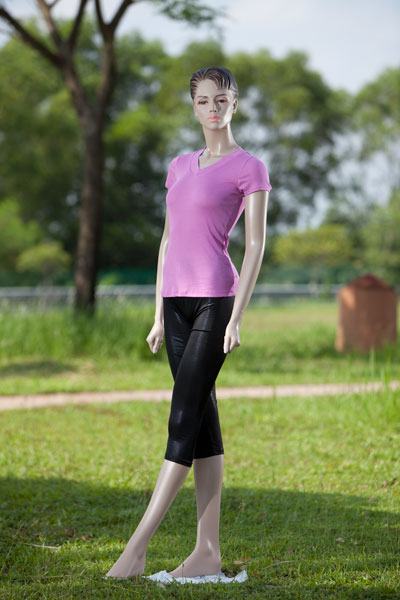
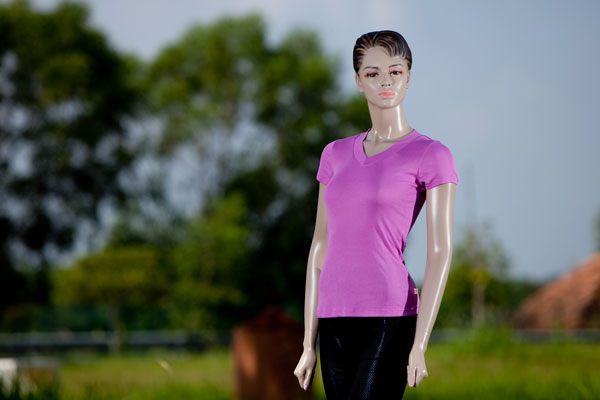
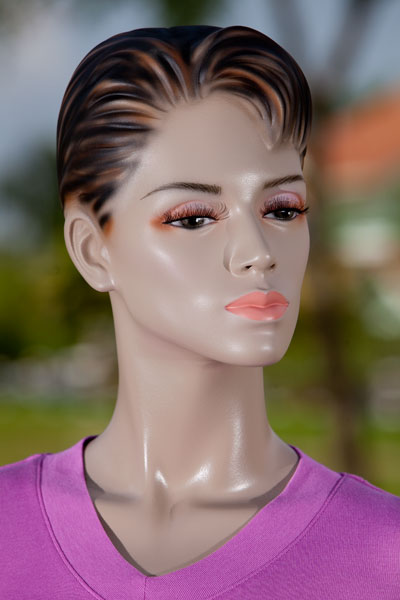
In Image 1, the high shutter speed reduced the background exposure, thus, background that should look brighter or overexposed will look as it it is sperated from the subject. If you are to shoot this same image by metering the subject, the camera metering will compensate the subject exposure and therefore will result in overexposed background. If you are to compensate the background, you will have to sacrifice your subject exposure. Well that sucks! Try shooting on hot sunny day with your aperture wide open?
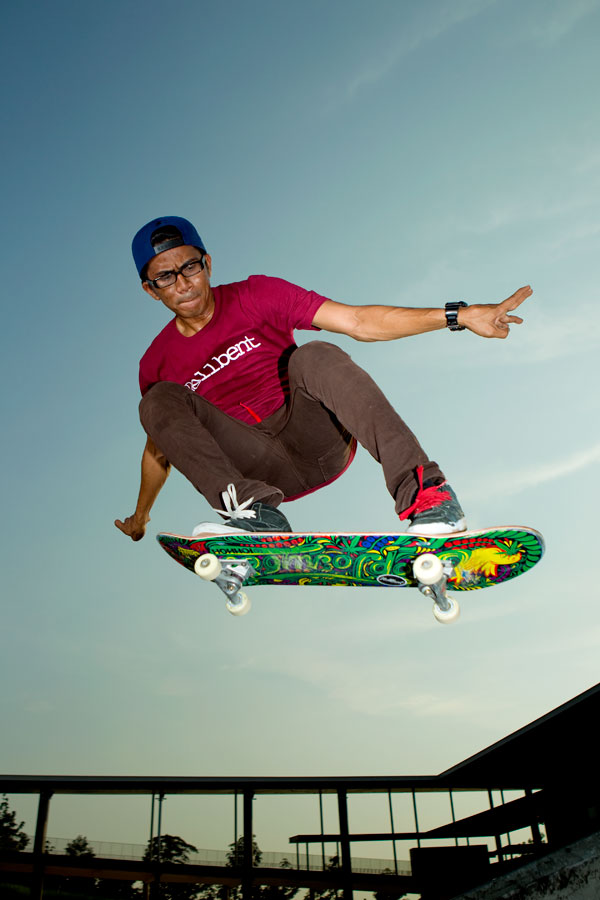
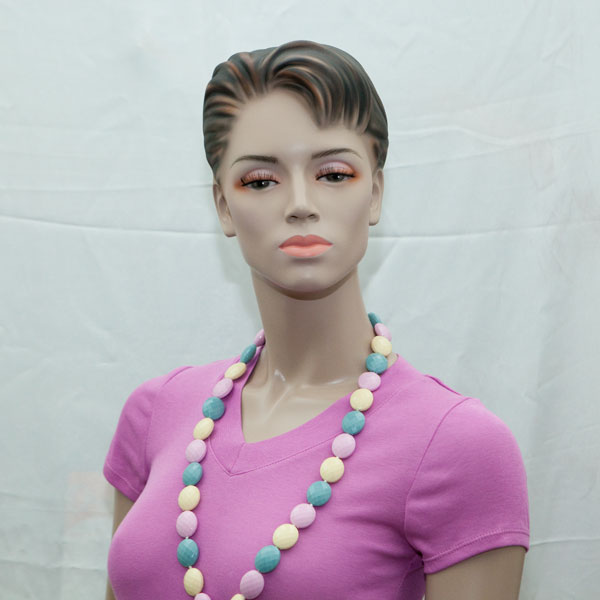
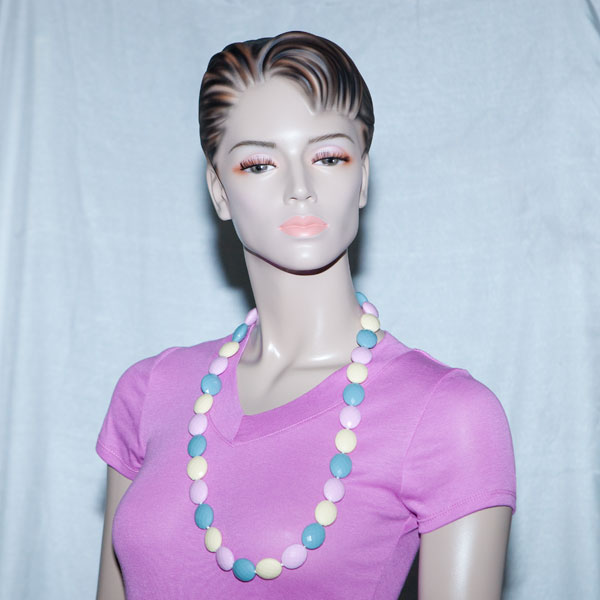
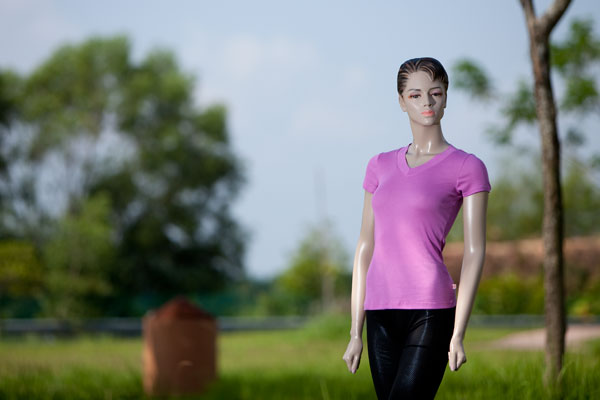
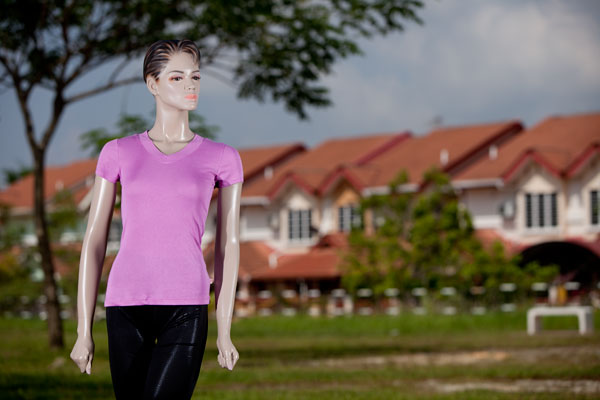
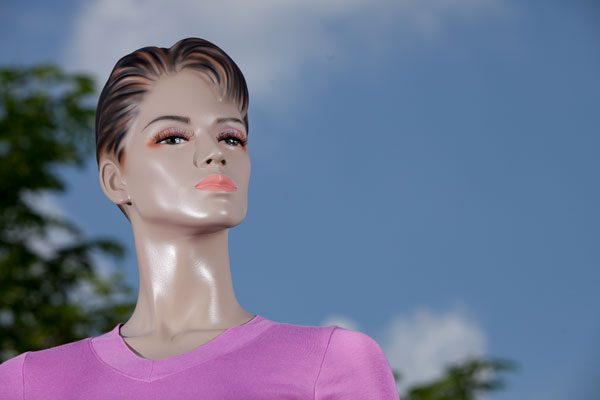
In Image 2, I shot the image in manual mode with low ISO but still at high shutter speed. Look at the background! As though the shot was taken after sunset. But it wasn't, it was taken after Image 1. The shot was taken at a very high speed that if you do the same setting without the speedlites and pocket wizard devices, you would have a dark exposure. In this case, high shutter speed reduce the background exposure but the subject remain well within perfect exposure because the speedlites were able to synchronise and lighten up the subject.
In Image 2, I shot the image in manual mode with low ISO but still at high shutter speed. Look at the background! As though the shot was taken after sunset. But it wasn't, it was taken after Image 1. The shot was taken at a very high speed that if you do the same setting without the speedlites and pocket wizard devices, you would have a dark exposure. In this case, high shutter speed reduce the background exposure but the subject remain well within perfect exposure because the speedlites were able to synchronise and lighten up the subject.

Disclaimer | Privacy | Copyright | Areas Covered | Contact
© 2009-2017 sanfreelancephotography.com. All rigths reserved. Managed by SmartSolutions Sdn Bhd.
© 2009-2017 sanfreelancephotography.com. All rigths reserved. Managed by SmartSolutions Sdn Bhd.
Is this tutorial helpful? Help us improve this site for the benefit of other. Please send me your comments or feedback to
san@sanfreelancephotography.com
san@sanfreelancephotography.com
FLASH PHOTOGRAPHY TUTORIAL SERIES
RF and HSS Flash Photography
"Bring Light To Your Subject". I like that phrase. Photography is about light and how to make use of available light and being able to manipulate light source(s). Before that, lets go back to the question of "when to use flash?". So, why limit your flash photography to only indoor or night scenes? I say, use them even during hot sunny day, on shaded area or outdoor. And if you have enough speed in your flash that synchronize to your camera, you can even change the entire scene.
In this tutorial, we'll show you how you can get fantastic results outdoor that looks like an indoor shots or perhaps the 3-dimensional effect. Here are some examples and how they were achieved.

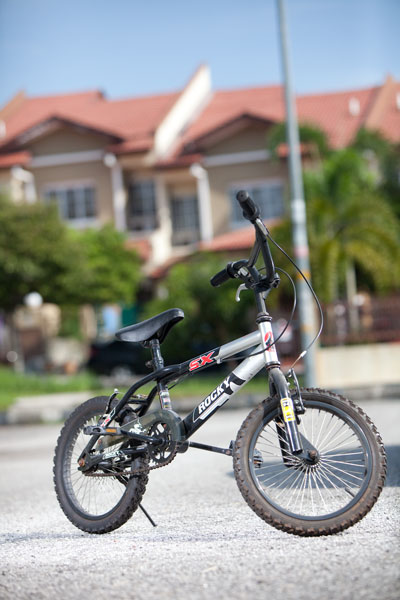
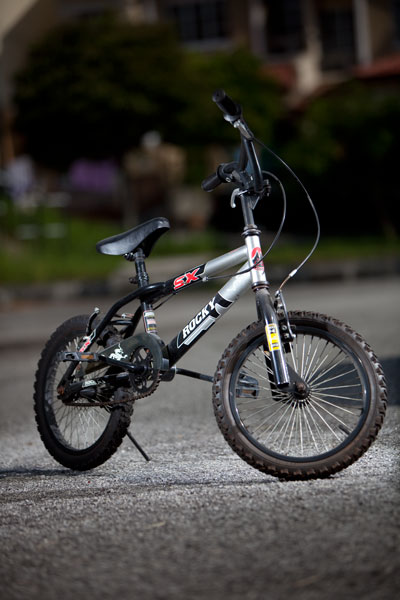
Image 1 : ETTL, Tv Mode 1/8000, f3.5, ISO800
Image 2 : Manual Mode 1/6000, f2.8, ISO100
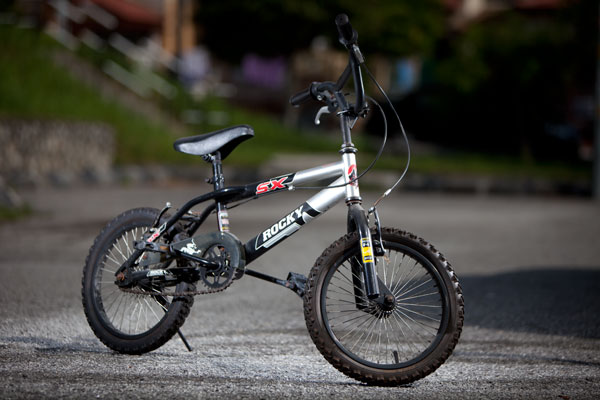
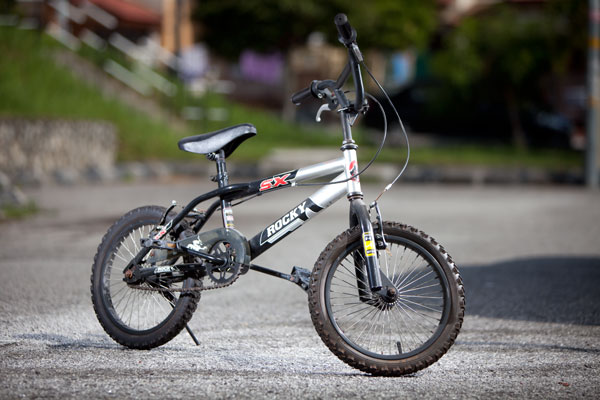
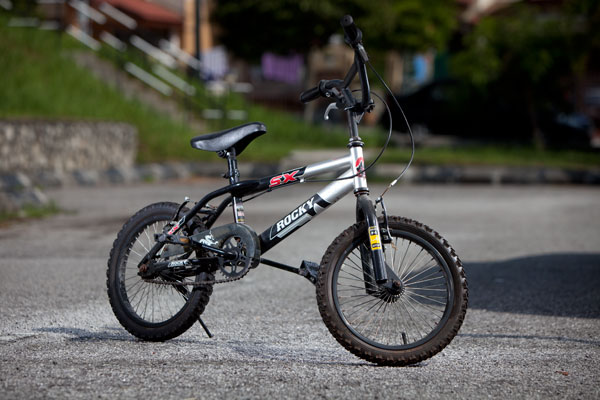

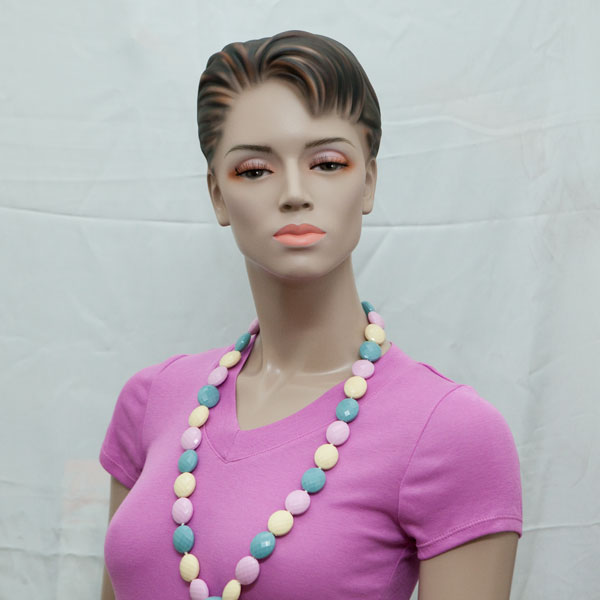
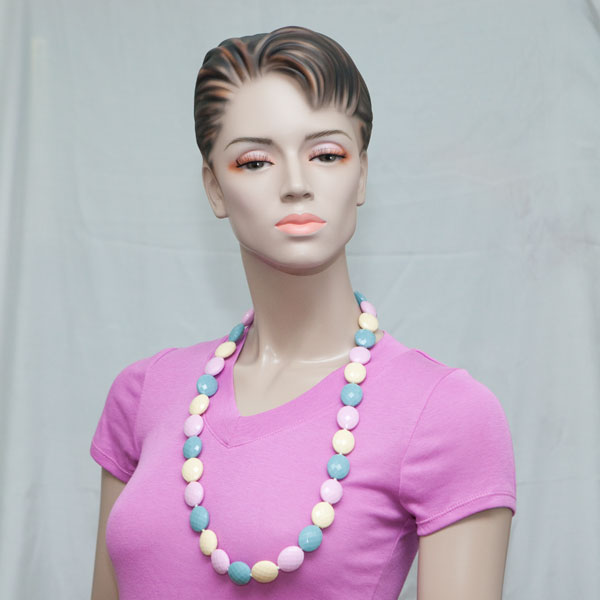
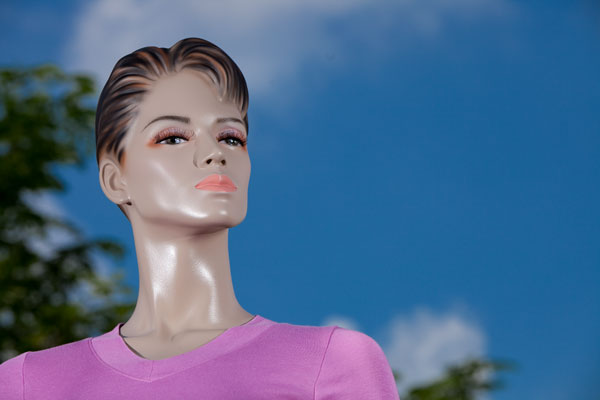
Image 3: Manual Mode 1/6000, f2.8, ISO100
Image 6 : Manual Mode 1/2000, f8.0, ISO400
Image 5 : Manual Mode 1/2000, f4.0, ISO100
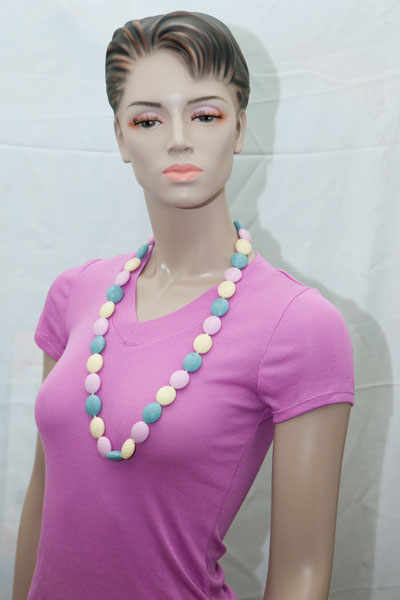
Image 4: Manual Mode 1/3000, f2.8, ISO100
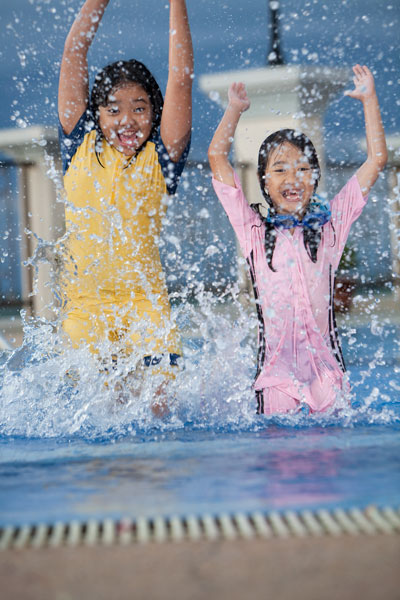
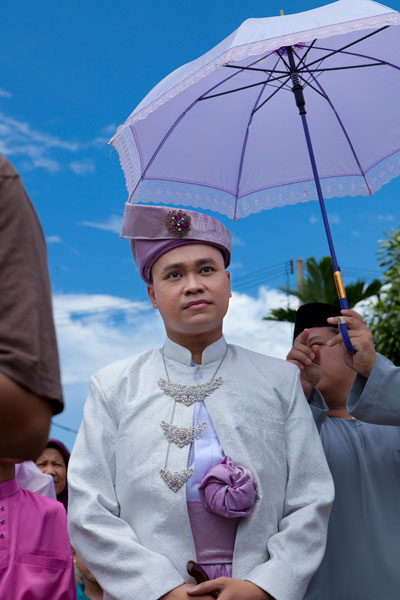
Image 8: ETTL, Av Mode 1/1250, f4.0, ISO400 (Shot with EF70-200 F2.8L IS USM)
Shot around 5pm with 2 speedlites/Pocket Wizard at 45 degrees angle to subject. Background separated with the high speed sync.
Shot around 5pm with 2 speedlites/Pocket Wizard at 45 degrees angle to subject. Background separated with the high speed sync.
Image 10: ETTL, Servo, Av Mode 1/500, f8.0, ISO100 (Shot with EF24-70 F2.8L USM)
This shot was taken around 1.30pm and it was hot with clear blue sky. Only one speedlight was used at High Speed. Underexposing the sky brings out that "blus" color. Take note of the subject well exposed.
This shot was taken around 1.30pm and it was hot with clear blue sky. Only one speedlight was used at High Speed. Underexposing the sky brings out that "blus" color. Take note of the subject well exposed.
Flash Bounce
Professional external flash head is designed to be flexible to allow for some degree of rotation to bounce light. Unfortunately, if you are using your pop-up flash as you main flash, it is of fix orientation and the fill light will flash direct to the subject. Off course your surrounding wall and ceiling will bounce the light but still not good enough to remove subject shadow.
Pop up flash is limited to synchronize at maximum 1/200 of your shutter speed. The light intensity is limited which is good for close up subject but may not be bright enough for group photo. Light throw distance is short. After using your pop-up flash for a while you will notice the limitations and you will now wish to have that professional flash. Refer to my BUYING GUIDE (under construction) for tips on getting professional flash.
How and when to bounce your flash depends pretty much on understanding basic principles of light (physics) and definitely lots and lots of experiment along with other lighting accessories. With simple setup, you can achieve a professional looking image with a very simple setup.
1 - Light move in straight direction not curves.
2 - Light will be reflected if it hits a reflective surface.
3 - Look at the surrounding before you bounce flash. White wall/ceiling will bounce all colors to your subject. Blue wall/ceiling will bounce blue color ONLY to your subject. If you do not want your subject to look blueish, do not bounce. This is just an example, there can be any other colors.
4 - If the ceiling is so high UP like 50 meters or so, do not bounce flash UP because the light that goes up to the ceiling cannot come back on time before the shutter close.
5 - There is no fix rule in the direction of flash bounce. Up, down, left, right, etc..... all up to you as long as you get your shot.
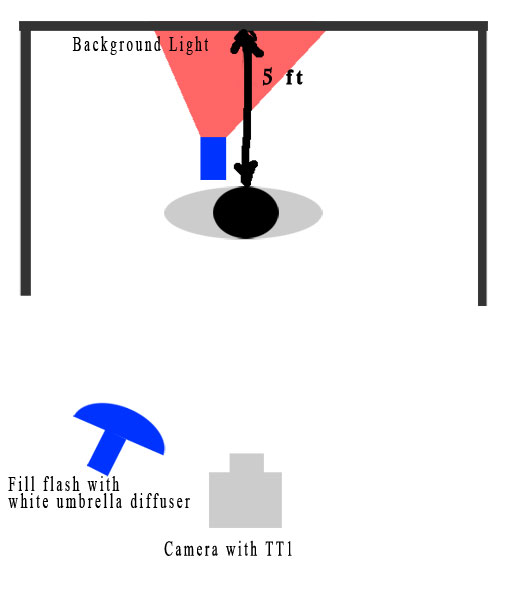
Flash = Canon 580 EXII.
Subject 1 feet frombackground.
Wall/Ceiling/Background = White
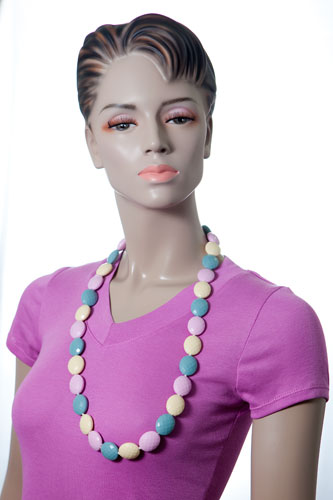
This is the most common setup you will encounter where you have a subject standing while you have your fill flash on your camera. Here are some samples and how the flash orientation and bounce angle will have an effect on the lighting scene.
Subject 1 feet frombackground.
Wall/Ceiling/Background = White
This is the most common setup you will encounter where you have a subject standing while you have your fill flash on your camera. Here are some samples and how the flash orientation and bounce angle will have an effect on the lighting scene.

Horizontal Orientation
Shooting in landscape orientation, shadow will be equally distributed at the background. Bouncing flash at the right angle will eliminate that shadow.
Shooting in landscape orientation, shadow will be equally distributed at the background. Bouncing flash at the right angle will eliminate that shadow.
90 Degree Bounce
Vertical Orientation
Shooting in landscape orientation, shadow will be one-sided at the background. because your flash is no longer at the centre line of your subject. Bouncing flash at the right angle will eliminate that shadow.
Shooting in landscape orientation, shadow will be one-sided at the background. because your flash is no longer at the centre line of your subject. Bouncing flash at the right angle will eliminate that shadow.
Direct Flash
45 Degree Bounce
90 Degree Bounce
45 Degree Bounce
Direct Flash
Direct Flash
45 Degree Bounce
90 Degree Bounce
Move Your Subject
This is the same setting as the 1st ones but subject was 4ft from the background. Notice the shadow size as you move your subject away from the background.
Move your subject even further away from the background and you will have the shadow cast on the floor, thus, it will not appear in your head shot.
Direct/Bare Flash
Take a good look at direct flash shots and compare to those being bounced. Very harsh/hard and changes the actual color. Nothing wrong with the white balance, all were constant 5500K. The problem with direct flash is not only you will get dark shadow but you will get hard light reflection from the subject and the direct angle of light resulting in direct angle reflection from the subject. If you are familiar with studio photography setup, you will notice that photographers will normally have their strobes at a certain angle to the subject. Even if direct angle is used, they will tend to use diffuser to wrap around the subject with the diffused light.
Take a good look at direct flash shots and compare to those being bounced. Very harsh/hard and changes the actual color. Nothing wrong with the white balance, all were constant 5500K. The problem with direct flash is not only you will get dark shadow but you will get hard light reflection from the subject and the direct angle of light resulting in direct angle reflection from the subject. If you are familiar with studio photography setup, you will notice that photographers will normally have their strobes at a certain angle to the subject. Even if direct angle is used, they will tend to use diffuser to wrap around the subject with the diffused light.
The background separation speedlite was exactly behind the model. Even though it was being blocked, it was not a problem for radio frequency technology. If you are to use the normal infrared signal as in normal Canon STE2 transmitter, signal can be blocked and may not reach the speedlite behind the model.
The white umbrella diffuser at fill flash wrapped around the subject with even light. By placing the fill light at 45% to the left, soft shadows were apparent on the model's left face and body. This is more pleasing because it creates a different mood and looked more dramatic. To get darker shadow on her left face, place a black color reflector so that no light get bounced from the black reflector.
The white umbrella diffuser at fill flash wrapped around the subject with even light. By placing the fill light at 45% to the left, soft shadows were apparent on the model's left face and body. This is more pleasing because it creates a different mood and looked more dramatic. To get darker shadow on her left face, place a black color reflector so that no light get bounced from the black reflector.
Multiple Speedlite
By using two speedlite, you can use one to fill subject light and the other to separate the background.
By using two speedlite, you can use one to fill subject light and the other to separate the background.
The following shots were taken around the same time as the bicycle above and about the same weather condition. I had a model placed beneath a tree to avoid direct sunlight but still had a bright and sunny background. Same equipment used as the bicycle shots and the results were fantastic. Canon speedlites combined with pocket wizard RF devices produces images outdoor that looks like indoor studio shots.


This was the actual weather during the photoshoot. As you can see, it was hot and sunny. A normal shoot without fill flash will normally results in either overexposed background or underexposed subject. For this shot, I switched on the speedlites. Looks good but we can still reduce the background exposure so that the model will "come out" from the image.
During this session, the two speedlites were positioned at various locations with respect to the model. What really important is that we must always try to separate the background from the subject and at the same time reveal details of the subject, especially the face. Yes, the face.
During this session, the two speedlites were positioned at various locations with respect to the model. What really important is that we must always try to separate the background from the subject and at the same time reveal details of the subject, especially the face. Yes, the face.
Take a look at the background exposure and details from the face. Just to add dramatic effect I positioned the speedlites to produce some soft shadows on the face.
The background looks separated and they do look like studio shots. Just ignore the reflection on the skin. They are not real skin anyway.
The background looks separated and they do look like studio shots. Just ignore the reflection on the skin. They are not real skin anyway.
Shots were taken at the open field/playground in front of my house. The houses looks like a poster or studio backdrop. BTW, I noticed now that my model look best from side way.
OK. Lets look at "Close-Up" images........
This last shot was taken at low angle so that we can see how the high speed sync can reduce background sky exposure to have more blue and less blown out sky.
Last but not least, we have the modified version of the last low angle shot, courtesy of Camera Raw. The sky looks better here.
What's HyperSync?
What is so special about Pocket Wizard HypserSync? Knowing very well that 580EX or any compatible speedlite can produce flash at high speed. Before that, lets understand how your camera shutter speed synchronize with your flash.
In high speed flash photography your flash will produces flashes continuously as if the subject is being exposed by continuous light source. Instead of a single flash, it produces multiple number of flashes. And because the shutter speed is so fast, speedlite will emit flashes of light continuously before the 1st shutter curtain lifted and after the 2nd shutter curtain closed. Your pop-up flash will not be able to do this function, thus, shutter speed is limited to only 1/200.
Without pocket wizard you can still shoot at high speed but you need to select the function from your external flash. It is not done automatically. The other problem is that your flash will emit light too early and stop flashing too late that it does not optimizes energy. There may not be enough time for your flash gun to recharge for the next shot, thus, you'll have an underexposed image. But pocket wizard has done more than just high speed flash photography. They optimize energy by synchronizing the flash gun to emit light just millisecond before and after the shutter curtain. In other words, it tells our flash guns when to exactly start flashing and when to stop, at the right timing.
You don't need to set anything on your flash to start shooting high speed or slow speed. Pocket wizard does all that automatically.
My next project will be sports photography with Pocket Wizard HyperSync.
Slow Sync or Second Curtain Flash
In contrary to HyperSync or High Speed flash is what is known as SlowSync or Second Curtain. If you are shooting at low speed say 1/10, your flash gun cannot be emitting light throughout the time sensor is being exposed or you may have an overexposed image. If there is only one flash of light, emitting it during 1st curtain or 2nd curtain makes a lot of difference.
If flash is emitted during the 1st curtain, the sensor will be exposed without flash during the 2nd curtain, thus, you may have a sharp image (from 1st curtain) behind a blur image (2nd curtain exposed). Overall, it is just a blur image. But flashing during the second curtain, the possibility of having blur image is lower because the sharpest image is in front.
For most flash, this mode has to be selected manually and the synchronization may not be efficient. Pocket wizard make sure that this is done automatically and efficiently synchronized. The images on the left were taken at 1/4 and 1/8 shutter speed with pocket wizard. Camera on tripod and the golf balls were on free fall gravity pull.
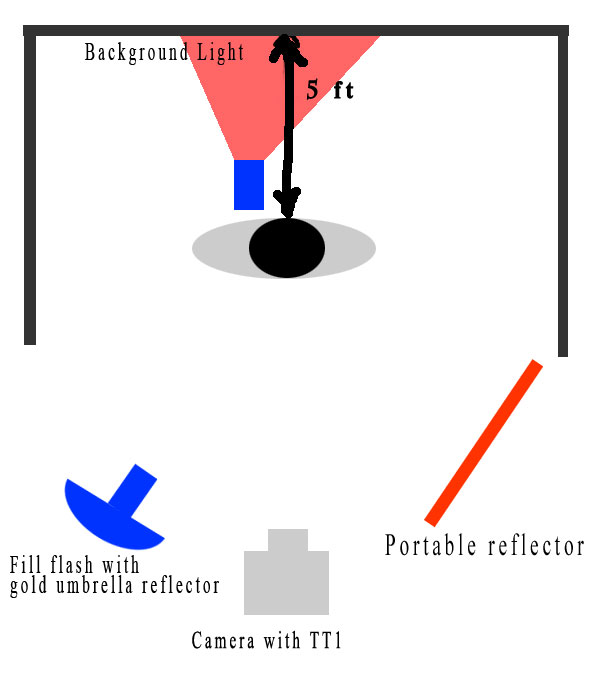
Reflectors
Gold umbrella reflector gives a warmer color and by using another reflector on the other side of the model's face we can have a lower light ratio without having to place another flash at that particular location. Lets have a look at the results.
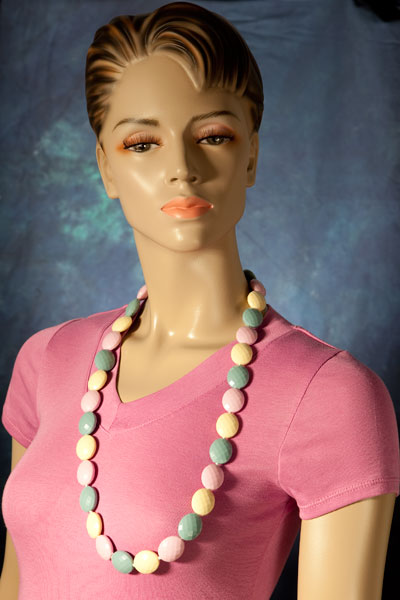
Without Portable Reflector - Too much details lost.
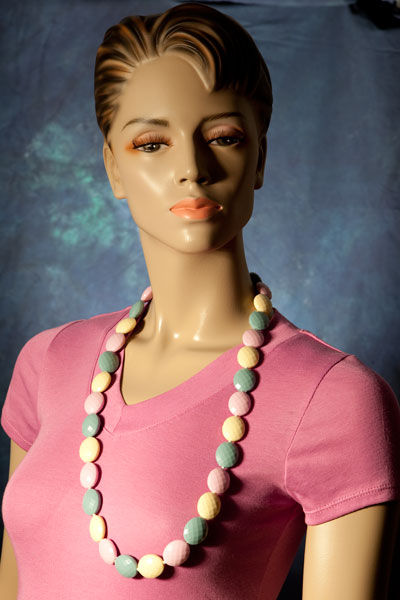
With White Portable Reflector - More details in face shadow.
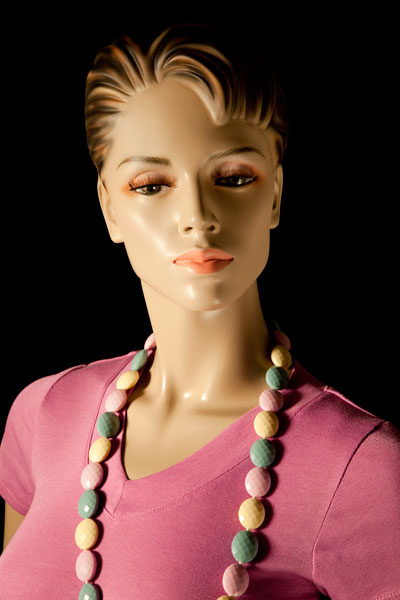
With Silver Portable Reflector - More details in face shadow compare to white reflector.
Background Light Switched Off
Umbrella reflector moved to straight angle of the left side face whilst the background light switched off. Switching off the background light with adequate shutter speed resulting in dark background. The subject which is nearest to the camera will have the light reflected faster to the camera whilst the dark background absorbed light from the umbrella reflector.
With White Portable Reflector - More details in face shadow.
With White Portable Reflector
With Silver Portable Reflector
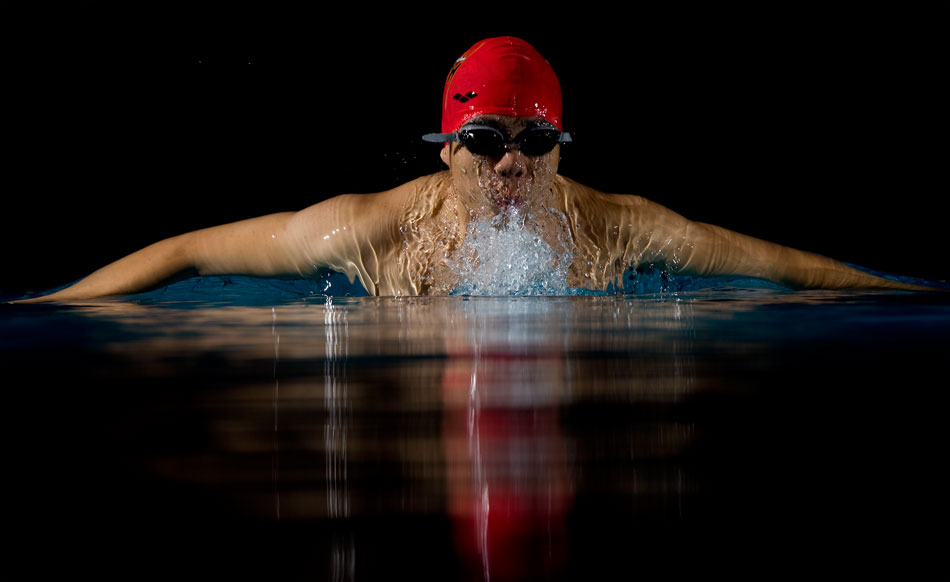
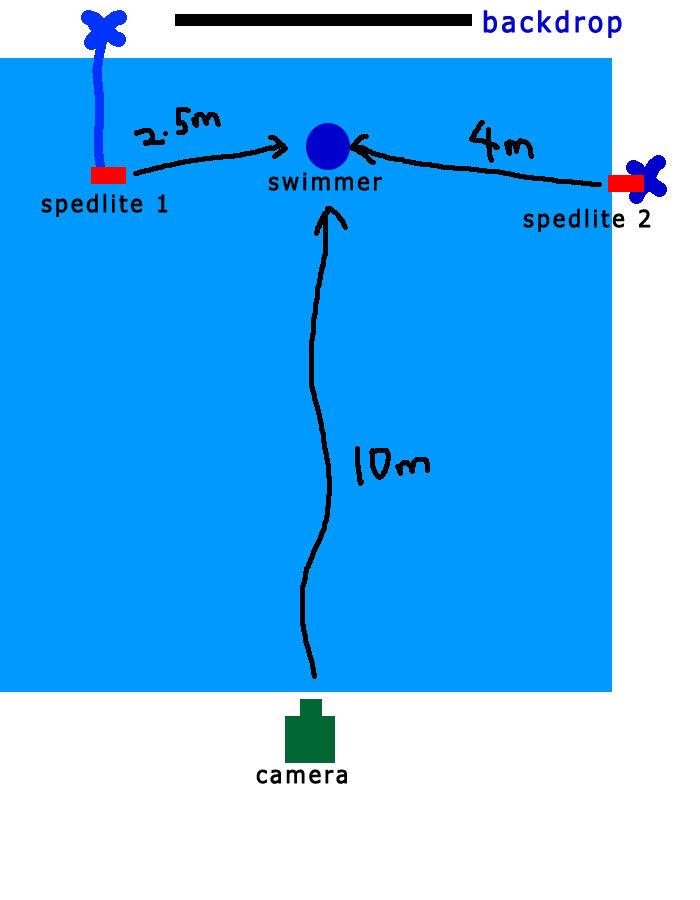
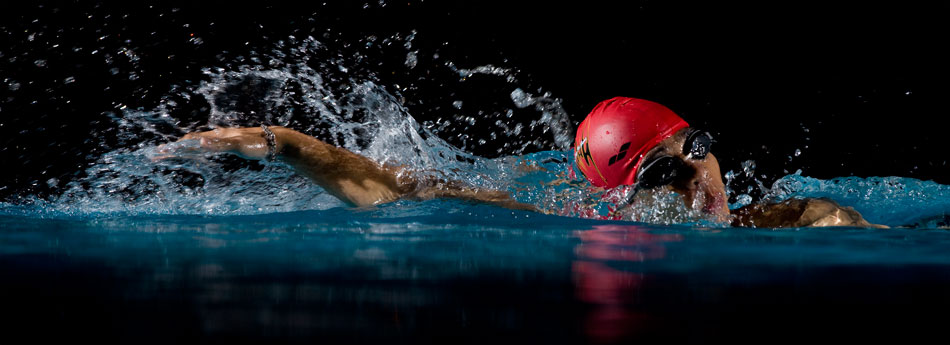
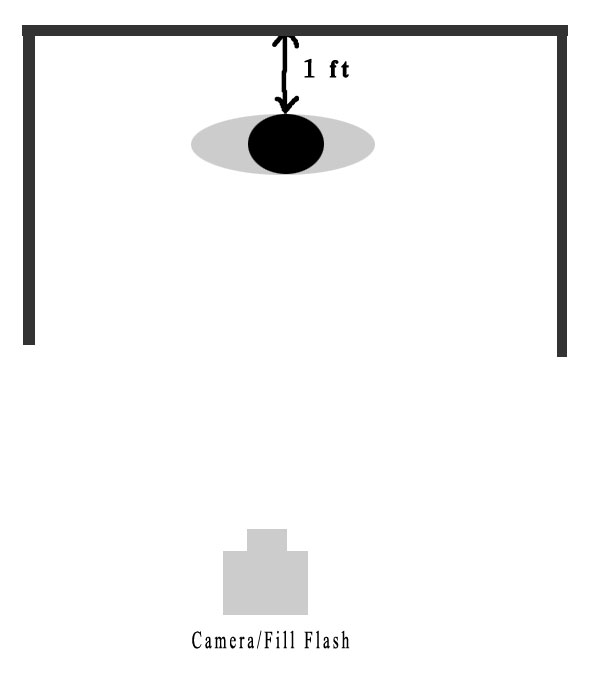
Pocket Wizard Pool Shots - SWIMMER
This the sketch of my simple plan. Objective is simple. To capture a swimmer in action with pitch black background. The photoshoot was done in an open swimming pool at a condominium facility at around 8.30pm. There were swimming pool lights switched on but when you shoot at high speed, the intensity of light will not be strong enough to be captured by the sensor. In order for reflected ambient light to be captured by sensor, you need a longer exposure.
In actual scene, you can see reflection of light on the black cloth background. The shot setting was Manual 1/400, ISO 200, F8. Speedlite 1 was on extended light boom whilst speedlite 2 was on normal stand. Speedlite 2 was a bit further to the subject thus, you can see exposure ration between the left and right hand sides of the swimmer.
Gear used - 5DMkII, 70-200 f2.8L II IS USM. Taken at 200mm.
Shot angle must be really low. You must be a the water level to get a good shot of a swimmer. Low angle will also allow you to avoid white color tiles of the swimming pool.
As you noticed, the background was totally black. Speed of 1/400 is enough to avoid fluorescent light reflection to be captured by the sensor.